Getting Started - Steps on setting up Personal Property Pro, adding & printing clients/properties etc
How do I backup my data
to another location?
Select menu item 'File' then sub-menu item 'Database
Functions'.
On the 'Manual Backup' tab, the white text box contains the location
where files are manually backed up. Click the 'Browse' button to
change it to a new location and/or to create a new folder for your manual
backups. Click the green Backup
Database Files Now button to backup your data. To save this new
backup location as the default, click either 'Save' or 'Save & Exit'. If
you just click the 'Exit' button, your location will be the same as it was
before. If you need to
restore the backup (on this or another computer), use the 'Restore Database'
tab in the same window. NOTE: The manual backup location is also where the program creates PDF
files, so be sure this location is accessible to all users of the program.
In some cases, you may want to change the backup location, make a backup, and
then close the window, leaving the original location intact.
How do I clear out last year's 'Return Status' for all
of the clients?
Select menu item 'File' then sub-menu item 'Utilities',
then click the 'Clear all 'Return Status' and related Dates button.
Account Number Prints in a Large Font Instead of a
Barcode and is chopped off at the bottom
Here is how you can manually
install the Barcode Font
Unable to Register ("...can't connect to our web server..." etc),
and you are using Symantec's Norton AntiVirus
Open Norton AntiVirus. Go to 'Settings'.
Click 'Personal Firewall' and turn it off. Click 'Intrusion Protection'
and turn it off. Try registering Personal Property Pro. Remember to
turn your settings back on when finished.
Assets TOP
Note: There is a new
field for Oklahoma forms 901 and 901-P beginning in 2024. Be sure to
read this,
especially if you use Beginning Balance Manual
Entries.
Importing from Lacerte
step-by-step instructions
Importing from
CCH ProSystem fx general step-by-step instructions
Importing from
CCH ProSystem fx Fixed Assets step-by-step instructions
Importing from
Creative Solutions Fixed Assets CS (Ultra Tax) step-by-step instructions
Importing from BNA Fixed Assets
Desktop
step-by-step instructions
FMV (Fair Market
Value)
There is a new FMV field for Oklahoma forms 901 and 901-P, beginning
in 2024. Be sure to read this,
especially if you use Beginning Balance Manual
Entries.
Information about using
Fair Market Value calculations in PPP
Peer-to-Peer Networks - Setting up a Server
Using a Mapped Drive
so all computers can run the program at the same time (including the machine PPP
is installed on)
Moving
the program from one computer to a different computer
Instructions on migrating or moving
your data files to a different computer (single or multi-user license)
Merging data
of two or more companies
We can now merge the data of two or more companies
into one data file.
Printing Problems (always consult your IT
person before installing any new drivers)
Brother Printer HL1440 -
Missing data - Brother Drivers
Kyocera - Characters look like garbage. Get the most recent
printer driver for your printer at
Kyocera Drivers.
Ricoh - PPP shuts down trying to preview or print a return
(sometimes reporting an error in a dll file such as 'ric63au.dll'):
Get the most recent printer driver(s) at
Ricoh.
Updating the PCL6 and/or the RPCS drivers will resolve most issues.
Garbage characters where text should print. Try using PCL and
not PS as your print driver (known to resolve HP4050 issue). If this
fails, try updating your printer driver (go to your printer website to get the
latest driver).
Installation Error 1720
If you receive the following error when trying to install or
uninstall Personal Property Pro:
'Error 1720.
There is a problem with this Windows Installer package. A script required
for this install to complete could not be run. Contact your support
personnel or package vendor'.
You may need to install/reinstall Windows Script 5.7.
Click here for XP or
click here for Win2003 Server or later.
If that fails you may need to download and run the
Microsoft Windows Installer Cleanup Utility to remove the installation from
Add/Remove menu.
Converting SaxTax data into Personal Property Pro
Tax Year
Changing the Tax Year
Open File Security Warning
You get a message such as 'The
Publisher Could Not Be Verified', when starting the program every time
Win7-8-10 Servers 2008/2012/2016/2019
Instructions for
installing PPP on a computer running Windows Win7-8-10/2008//20112/2016
Please click here for important information for Oklahoma renditions that use Beginning Balance Manual Entries, beginning in tax year 2024 (shown farther below).
Your county form may require a 'Beginning Balance' for each asset category. There are three ways to get an accurate 'Beginning Balance':
[Preferred] Enter every asset
your client owns into the program, setting the 'Year Reported' to the year in which
it was acquired; for Tax Year 2006, Year Reported = 2005 etc).
The quickest way to do this is to use our Import
Assets feature, but you can add them one at a time if you choose.
Once you are familiar with the hot-keys, manual entry of assets is very fast.
Note: Beginning
in tax year 2024, this is the best way to ensure that Fair Cash Values
(Market) are calculated for all of the assets.
Click here for more information.
Create a single asset entry for each asset category that has a prior year balance, with something like "Furniture & Fixtures - Beginning Balance" as the description, and enter the total cost of all of the assets for that category. Be sure to use TaxYear-2 for the 'Year Acquired' so the amount shows up as prior year assets. In future years, you will need to use the 'Add a Deletion' button to remove assets from this lump sum asset entry amount.
Enter the prior
year beginning
balances in the 'Beginning Balance Manual Entry' text boxes on the asset
screen.
Leave these amounts
the same indefinitely unless you later add all of the client's assets into the
program. We recommend getting all of the asset into the program
as the best method (step #1),
but to quickly create returns the first year you can simply use the 'Beginning
Balance Manual Entries' to bring the return up to date. Note that if you
later delete assets that are contained in these 'Beginning Balance' entries,
you will need to use the 'Add a Deletion' to mark an asset as deleted.
Note: With the addition of Form 904-3-A we added in Tax Year 2007 we
recommend you do not use 'Beginning Balance Manual Entry' fields, but
rather import or key in all of the assets for each customer. Form 904 is a
complete asset listing and does not include any 'Beginning Balance Manual
Entry' amounts, nor does it include assets added as a deletion (to offset
Beginning Balance Manual Entry amounts).
One advantage of creating a single asset entry for each category (step #2) versus using the 'Beginning Balance Manual Entries' (step #3), is that the single asset lump-sum amount will print on the 'Asset Listing' report and the totals will then match the totals on the Asset screen, however any assets created as a deletion will not show on Form 904-3-A because assets 'created as a deletion' are originally intended to be used to offset 'Beginning Balance Manual Entries'.
One disadvantage of using 'Beginning Balance Manual Entries (step #3), is that these 'lump sum' amounts do not print any asset listing report or asset form (such as form 904-3-A).
Oklahoma Fair Cash Value (Market) field - New in 2024
January 2025: We continue to handle the 'Fair Cash Value' field going forward for tax year 2025 and beyond, using the same methodology below. If you use 'Beginning Balance Manual Entries' in Oklahoma, and have reviewed this page previously, there is nothing new here.
For tax year 2024, the Oklahoma Tax Commission added a new field on forms 901 and 901-P called 'Fair Cash Value (Market)', which is located in 'PART THREE: OKLAHOMA TAXABLE INVENTORY". This field applies only to the fixed assets.
For tax year 2024 we contacted Tulsa and Oklahoma counties and we were told this field at this time is not required. You might want to contact the counties in which you file renditions and confirm if the field can be left blank.
Below is the new field on the form itself:
Tax Year 2025 forms:
Tax Year 2024:

Below are the instructions for the new field, found on the instructions page:

If you do
not
plan on printing this field, you can ignore the rest of the information below, because by default, Personal Property Pro will
not print that field unless you uncheck a checkbox, found on the 'Assets'
tab, called 'Do not print the FMV on the form",
shown below.
If you decide to print this field you will need to read
the information below, and possibly take 2 actions to make the FMV more
accurate.
Note: The first time, If you don't
open the client, but you rather preview or
print the returm from the Client Selection screen, it will show the FMV total on
the form.
After you open it, the 'Do
not print the FMV on the form' checkbox will be checked and that field
will not print on the form unless you uncheck that checkbox and then
save the client.
Again, if you do not
intend on printing that field, you can disregard the information below.
However, should
you decide to print that field, follow the information below and the steps
required to make the FMV calculations as accurate as possible.
Personal Property Pro (PPP) has always calculated the Fair Market Value for all assets entered into the system, it has never been a requirement to print anything on any form (although the FMV calculation for assets does show up in the 'Asset Listing - Generic with FMV calculations' and 'Asset - CrossTab Summary' report (page 2).
PPP takes the cost, age and asset category of each asset, and runs it through the State depreciation table to come up with a FMV calculation.
There are two things need to do in order for thse calculations are as accurate as possible if you plan on printing that field.
1) Making sure all used assets have their 'Age' adjusted
to at least [Tax Year - Year Acquired] (this has been made very easy with one
utility button).
2) Convert all 'Beginning Balance Manual Entries to lump sum asset
entries (this is a little more complicated but requires only
clicking a few
buttons within each client).
1) Making sure the age of Used assets have an age of at least [Tax Year - Year Acquired]
Until this year, when adding Used assets in Oklahoma, the
asset was assigned a year of 1 and could not be increased when adding or editing
a button.
To increment the age of your used assets (for
any state), you
would need to go to menu item 'File', then 'Utilities' and then
click on the 'Increment Used Asset Ages by One Year button. This would add 1 to
all of the Used assets within the entire system,
for all states. Doing this annually, at the beginning of the year after
installing the new software, keeps your Used assets incrementing with each new
year release of the program. The utility is seen below
The utilty below still
should be run just once per year after
installing the new version.
Since using FMV calcuations requires an accurate Age,
this presents a problem if the user has not been running the 'Increment Used
Asset Ages' utility shown above.
If it has never been run, all of the Used
assets in the system will have an Age of just '1', putting it at the top of the
depreciation % good and cause a much higher FMV calculation.
There are two ways to fix this:
1) Asset Ages in
Oklahoma can now
be seen and modified per asset in the asset entry/edit mode.
2) All Used assets
that have an age of less than 'Tax Year - Year Acquired', can now be
automatically set to 'Tax Year - Year Acquired' with a new
Utility button.
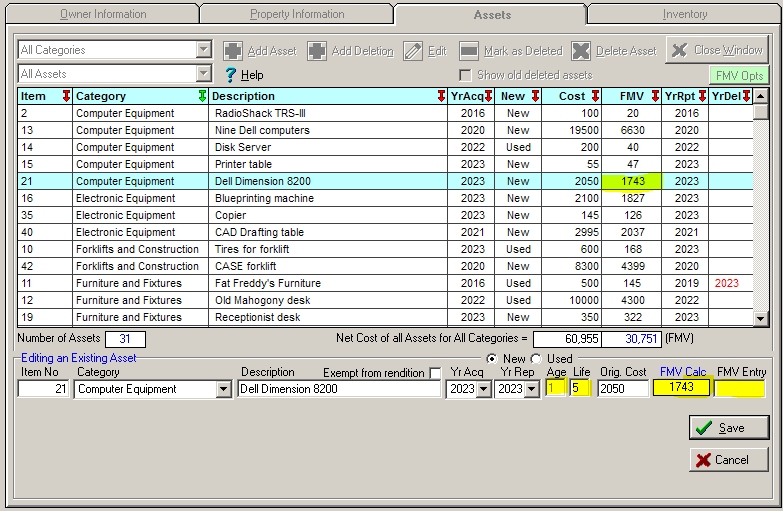
Changing the Age of an asset manually:
Below is a a screen shot of adding/editing an asset, and
beginning in 2024 you can also see both the asset's Age as well as the Life and
the calculated FMV while adding/editing the asset details.
You can now also override the Life
of the asset, and if the asset is Used, you can also override the Age of the
Used asset as well, as seen below.

As you can see above, assuming the Tax Year is 2024, the
Age of the asset should be at least 3 instead of 1.
Now you have the ability
to edit the asset and make sure the Age of a Used asset is at least [Tax Year -
Year Acquired] (or more).
We have added a new Utility that will set all of the Used assets in the system that have an Age that is less than [Tax Year - Year Acquired], to [Tax Year - Year Acquired], as shown below:
When the utility above is pressed, the program will explain
what it will do, and then give you the option to proceed or not.
After completion it
will tell you how many Used assets had their age increased to [Tax Year - Year
Acquired].
This will not affect assets that have an Age >
[Tax Year - Year Acquired].
This utility cannot be undone.
2) Convert all 'Beginning Balance Manual Entries to lump sum asset entries (this is a little more complicated but requires only clicking a few buttons within each client).
Beginning Balance Manual Entries (refered to as 'BBME' below) were basically a way to take a client in Oklahoma, and just start with all of their totals for each asset category without entering or importing all of their individual assets. Though not the prefered or recommended way, if this was done, the way to remove any assets (and amounts) out of the BBME, was to add 'Asset Deletions', which would be negative asset amounts to offset it.
This worked well as the 901 forms just wanted the
Beginning Balance (which would be any BBME entered in PPP,
plus any assets added into the system in later
years but prior to the current year, shown as 'Prior Assets' below,
getting our 'Beginning Cost'), Additions, Deletions, and Ending Cost totals.
But... since we have no idea when any of the assets in the 'Beginning
Balance' were acquired, we have no way to accurately calculate a FMV for that
bundle of assets.
In fact, the system doesn't calculate any FMV for BBME
since they are not actually assets within the system.
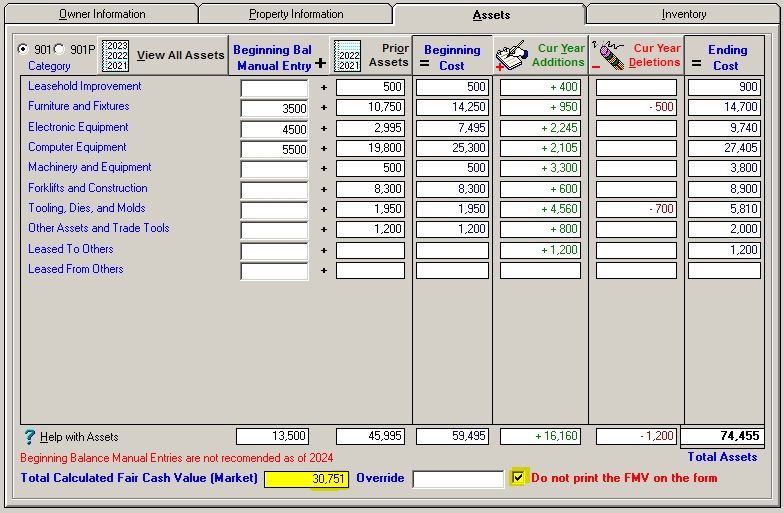
The example below shows $50,000 in Beginning Balance
Manual Entry for Computer Equipment, with a few entries in the detailed asset
screen shown further below:

The 'Total Assets' in the bottom-right corner is correct at $48,400, but note
that the Total Calculated Fair Cash Value
(Market) shows a negative
amount of $512, which is incorrect.
Let's look at the asset detail screen
behind this, and let's assume this client was added around 2017 starting with
the BBME of $50,000:
They 'Added a Deletion' for a monitor that cost $400
and they marked it as acquired in 2019.
Both the Cost and the FMV amounts
are negative since they would offset anything in the Beginning Balance Manual
Entry of $50,000.
Then they got rid of an HP Server that cost $2400 and
set the Year Acquired to 2021, another asset 'Added as a Deletion' (against a
BBME),
Again, both the Cost and calculated FMV are shown as negative amounts.
Then they added a Dell laptop in 2022 that cost $1200, with both the Cost
and FMV showing as positive amounts.
So right now, 'Net Cost of all
Assets...' is -1,600 and the net FMV is -512.
In prior software versions, the
net cost would still be -1,600 which is OK because it was reducing from the
BBME, but the negative FMV presents a problem as shown above.

If you have some clients where you started with BBMEs, we recommend one of
two things:
1) Manually enter, or use our Asset Import feature to get all
of the assets into the system that made up the BBME, and then delete the BBME on
the Asset Summary window.
(long and cumbersome but the
most accurate way)
2) Add a single asset
entry for each asset category for which you
have a BBME
...setting the Year
Acquired and Year Reported to at least
two years
before you did the
client's initial return.
... example: If you did their first return in 2022 and you used BBME, set the
Year Acquired to the newly created bulk asset to 2020 or earlier (if you know
the average age of assets was more than 2 years old, you might reduce it more).
...settting the Cost to the same exact amount as the BBME that you have for that
asset category.
...and then delete
the BBME for that asset category on the Asset Summay screen.
Here's what that would look like:
I added a new asset with the cateogry Computer Equipment, calling
it 'Computer Equipment - Beginning Balance' (whatever you want to call
it).
I set the Year Acquired to 2017 (since it's listed as a New asset, the
Year Reported will be the same).
Note that the Age is 7 [tax year 2024 - 7],
and can't be edited since we are reported as a New asset.
7 years is beyond
the asset category's Economic Life of 5, which puts all of those assets in the
lowest percent good calculation (20%) since we are 7 years past when we did this
client's first return.
I added 50,000 as the Original Cost.
And saved it.
Note that the Net Cost for All...' is now $48,400
And now let's look at the summary screen after we removed the BBME for Computer Equipment which was $50,000:
1) The BBME of $50,000 for Computer Equipment is gone
after we removed it.
2) Prior Assets used to be -2,400, but is now $47,000
($50,000 newly added asset minus the $2,400 deletion)
3) Current Year
Additions are the same.
4) Current year Deletions are the same (the $400
monitor that was created as a deletion against the Lump Sum asset we added to
replace the BBME.
5) The Total Calculated Fair Cash Value (Market) is listed
as $9,488, which matches the asset detail screen.
A couple of things to note:
1)
If for example you have clients that you added more than
10 years ago, and you started with a BBME but
then deleted it and replaced it with a single asset entry, setting the 'Year
Acquired' to 2014 or earlier, the calculated FMV should be more accurate (less
any wear and tear or other circumstances that would cause you to manually
override the calculated value of individual assets or the entire calculated
amount). This is because almost all asets in the system have a maximum Economic
Life of 10 years, and a Year Acquired of 2014 would put them well into the
bottom of the FMV calculation as regards the Percent Good factor.
2) If you have clients you have added
recently
(plan to this year, did last year, or in the past years but less than 10
years) and you used the BBME but want to replace them with a bulk single asset,
the FMV calculation is going to calculate based on the Economic Life of the
single asset
you add to replace the BBME, based on the Year Acquired for that single lump sum
asset entered. This means some assets in the bulk might be ony 1 year old, 3
years old, 5 etc.. This means the FMVwill not be 100% accurate, so consider when
adding a single asset bulk entry to replace a BBME, what might be the average
Age of the assets that the client had. If you filed a rendition for the client
the first time in 2020, you would want to set the Year Acquired to 2019 or
earlier.
3) If you continue to use BBME for new clients, the FMV calculation
will never be correct as to FMV calculation is done on BBME's. It would be
better to add a single asset with the client's existing total for each asset
category, and set it at least 2 years before the current tax year. If you set it
to just one year before the tax year (the prior calendar year), it will show up
as a bulk 'Addition' for the current year.
We've added a button where the user can click one button and
the program will automatically remove all BBME and replace them automatically with a new
single lump sum asset for each category.
The question is, what should be set
for the 'Year Acquired' (and 'Year Reported') fields?
1) Option 1: Set them all
to TaxYear - (the Economic Life of the particular Asset Category + 1)
In that instance, the single lump sum asset created for
Computer Equipment for tax year 2024 would be set to 2018. This would
place them automatically in the lower end of of the FMV calculation.
.. the asset created for 'Furniture and Fixtures' would be set to 2013 (2024
(tax year) - 10 (Economic Life for Furniture and Fixtures + 1) = 2013
2)
Option 2: Find the oldest asset entered for the client (whether an asset that
was added, or an asset the was creation as a deletion to offset a BBME, and if
it is older than 5 years ago, set them all to that year -1.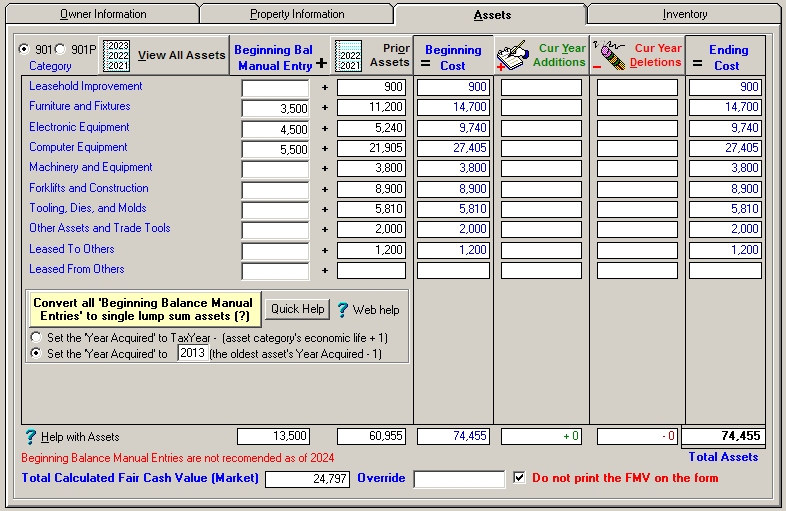
This above button would only be visible if the user had at least one BBME.
This would give the user the ability to click just ONE button, and the program
would remove each BBME and replace it with a single lump sum asset with the Year
Acquired of 2013 (or they can override it) for the particular asset category
that the BBME is for.
Whatever is decided on as regards the 'Year Acquired'
for the lump sum asset, this is a general guess as to what the average is.
For 'Computer Equipment', some might have been added more recently than 5
years but some might have beenn added many years ago, etc.
If you click the 'Quick Help' button
above, the following will popup, based on which option is selected:
...if
Option 1 is selected [ Set the 'Year Acquired' to TaxYear - (asset
category's economic life + 1) ]

... if Option 2 isi selected [ Set the 'Year Acquired' to #### ' (the oldest asset's Year Acquired - 1 ]

When you click the 'Convert All Beginning Balances Manual Entries' to lump sum assets(?)
![]()
One of the above messages will appear, and
then give you the options to convert them. After the conversion you will be
given the option to automatically remove the Beginning Balance Manual Entries.
Those should be removed otherwise you will have a duplicate amount in the 'Total
Assets' (new lump sum balances that equal the manual entries, plus the manual
entries.
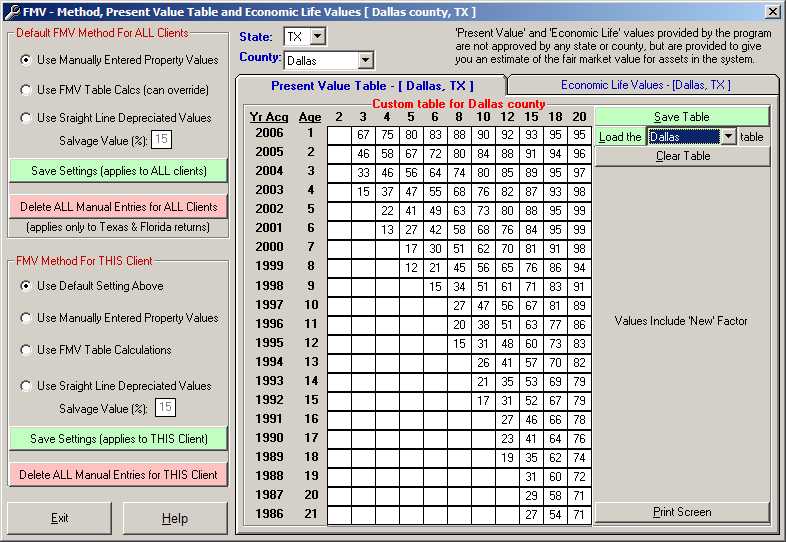
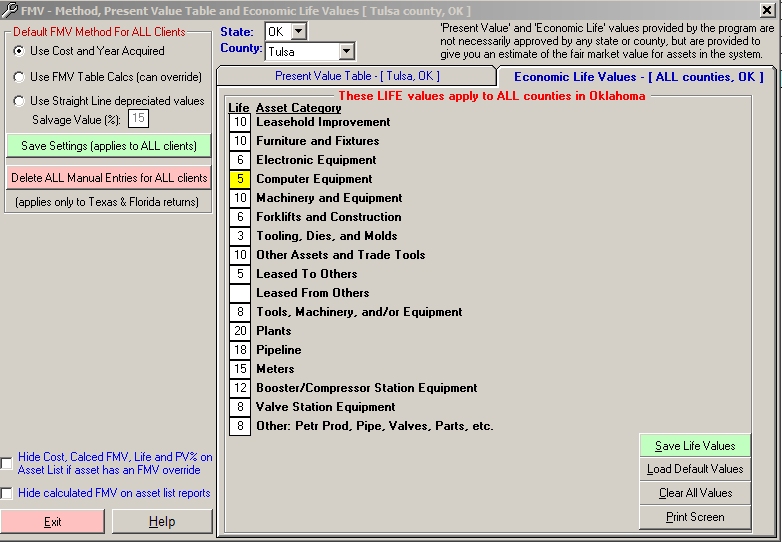
Below are the screens for 'Economic Life' and the 'Present
Value Table' that you can find (and edit) for each county.
You can get their
by clicking the green FMV Opts' button in the asset detail screen, or by
clicking menu item 'Help' then 'FMV - Method, Present Value Table,
Economic Life'.
Economic Life Values:
Note that Computer Equipment is 5
years.
Present Value Table:
Highlighting the values for an asset
that has a 5 year Life.
More flexibility:
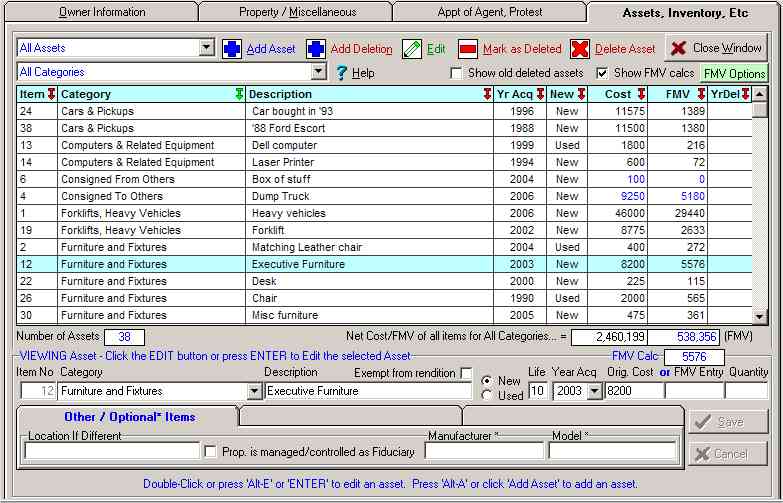
To handle this, we first added several items to the asset entry detail window (pictured below):
1) A new 'FMV' column that shows the
calculated FMV for each individual asset.
2) A new 'Age'
field, which displays the age of the asset.
Note: If
the asset is 'New', this cannot be modified as the age is calculated based on
the Year Acquired.
If the asset is 'Used', you can now override the age of an individual asset.
Previously this could only be done clicking on menu item 'File' then 'Utilities',
then clicking the 'Increment Used Asset Ages by One Year' button, which
should still be done annually at the beginning of each year, as that will
increment the age of ALL used assets by one year.
3) A new 'Life'
field, which is the Life of the asset based on the default economic life for
that asset category.
The Life of each asset is initially
assigned by the default Economic Life of the asset category.
These Economic Life values for asset categories can be seen by clicking the
green 'FMV Opts' button below (in the upper-right corner), or by clicking menu
item 'Setup' then 'FMV - Method, Present Value Table, Economic
Life'.
There may be instances where, for example, an
asset that is categorized as 'Machinery and Equipement', which has a default
economic Life of 10 years, may be needed to change to 8 or 12 etc. based on what
type of machinery it actually is. Being able to change the Economic Life of an
individual asset is new this year.
Setting an Economic
Life that to a value does not exist in the Economic Life table will result in an
FMV calculation of zero, so do not use 1, 11, 13, 14, 16, 17 or 19.
(a screen shot of Economic Life Values for Oklahoma are shown farther below)
4) A new 'FMV Calc' display-only field, which shows the
calculated FMV dynamically as you enter/edit either the Age, Life or Cost.
5)
A new 'FMV Entry' field, where you can override the calculated
FMV value for an individual asset.
We believe this gives you great flexibility for each
asset regarding calculating the FMV for each asset.
On the asset summary
window, we have added two new fields:
1) 'Total Calculated Fair Cash Value (Market)' (in yellow below).
This is the sum of all FMV amounts for every asset in the system... either the
calculated value or the override for each asset.
2) 'Override' (in
yellow below), which lets you override the total calcluation that is to the left
of it.
Note: If you do not enter anything in 'Override', the 'Total
Calculated...' will print on page 1.
If you enter -1
in the 'Override' field,
nothing will print on page 1.
This gives you the ability to either submit nothing, or manually write
something in that field.

Please let us know if you find any errors in this
explanation.
From the Asset Tab, you can access 'ALL' assets, 'Prior Year' assets, 'Current Additions', 'Current Deletions', for either ALL asset categories, or any specific asset category.
After you click one of those buttons, another screen pops up where you can add an asset, edit an asset, mark an existing asset as deleted, or actually delete an asset. One button is labeled 'Add a Deletion', which will create a new asset, but it will be marked as deleted in the current year. This is useful if you start with 'Beginning Balance' asset entries (for Oklahoma but not Oklahoma County format), and you want to create a deleted asset that applies to the 'Beginning Balance Manual Entry). Assets 'Added as a Deletion' do not show up as 'Prior Year' assets in the year you created them, but in future years, they will show up as items in your 'Prior Year' assets, that are now flagged as having been deleted.
If you choose to use the program primarily to fill in the
general information, and simply attach a list of assets each year:
1) Create your client, entering all client information on the Owner and
Property tabs.
2) For each Asset Category, take the actual Beginning Balance from last year's
return, and either
A) Enter that number in the 'Beginning Balance' manual inputs
(Oklahoma only)
- or -
B) Create a single asset, calling it something like '2004 F&F Beginning
Balance Entry', making sure the 'Year Reported' field is CurrentTaxYear-2 (2003
for 2005 return).
3) Additions: For each category, add a single asset with "2004 F&F Total Additions, See
Attached", and the total amount.
4) Deletions: For each category, add a single asset by clicking 'Add a Deletion', with
"2004 F&F Total Deletions, See Attached", and the total amount.
Your numbers will be correct on Page 1. Page 2 will show each total with
your description for each category, and you can attach your other attachments
showing the additions and deletions detail. Form 904-3-A however, does not
include either BegBalManEntries or assets created by using the 'Add a Deletion'
button.
Asset entry is straight-forward, asking for a Category, Description, New/Used status, Year Acquired, Year Reported (this is TaxYear-1), and depending on your state or county, Fair Market Value, Cost, or other items. Some asset category types will show other items to enter, such as Lease information (if the asset is related to a lease), Consignment information, Petroleum information (901-P), Vehicle information, etc. Learn to use the Hot-Keys (Alt-A to [A]dd an asset etc) and asset entry will be quick and (we hope) painless.
If your tax or asset software can export assets, Personal Property Pro can open these asset files and import the assets directly into its database, significantly simplifying the initial process of setting up your assets, and making it easy to add new assets and mark deletions in subsequent years.
Click Here
for line by line
instructions for
Lacerte
Click Here
for general instructions for
CCH ProSystem fx
Click Here
for line by line instructions for
CCH ProSystem fx Fixed Assets
Click
Here for line by line instructions for Creative
Solutions Fixed Assets CS
Click
Here for line by line instructions for BNA Fixed
Assets Desktop
Exporting your client/property assets from your tax or
asset software
Open the tax or asset software you use, and for each client/property export the asset
information into a
separate file. If possible, save it to a CSV (comma
separated value) or ASC (ASCII) text file. The steps for this process will be similar to this (depending on your software):
If you want to view the raw contents of an exported file, right-click the file and then click 'Open With' and choose 'Notepad' or Microsoft Excel. You can also view the raw file by clicking on the 'View File' button while in the Asset Import window (upper-right corner) within PPP.
Importing Assets into Personal Property Pro
The first step is to locate the file that contains the assets you wish to import for this client.
PPP will attempt to open the file and read all of the information into a grid of 'X' number of rows (one row per asset) and 'Y' number of columns. The number of columns will vary depending upon what type of software you used to export your assets. Each column will contain similar data; one column might be your internal Asset Number, another might be the Description, Cost, Method, etc.
The first two columns are reserved. The first column is named 'Import?" and contains a checkbox. Assets that have 'Import?' checked will be imported in the final process. The second column is the 'Asset Category' column. Each Asset Category is initially set to 'Unassigned', and must be assigned to an actual Asset Category as defined by PPP (your State/County form). Beyond the first two reserved columns, are the actually data that PPP read from your file. These columns are numbered 1 through Y (Y being the number of columns of data in the export file). PPP initially calculates a ballpark width for each column, but you can adjust the column widths by clicking and holding the mouse down on a column divider (in the actual column heading of the grid), and sliding it to the left or to the right. PPP will remember the column width for the first 10 columns and will set the columns to these widths later for you when you re-access the Asset Import window.
Once PPP has processed the file, the very first time you import assets it will pop up a message asking you to provide the following four items:
These are the four items that must be marked to be able to import assets. PPP will remember these four settings on subsequent Asset Imports. Once these are set, they should remain the same unless you change tax/asset software or if your software changes its export file format. As you change these settings, PPP will change the Column Heading rows to bold black, the Asset Description column data to blue, the Date Acquired column data to red, and the Cost column data to green.
Once you have correctly set these four items, click the 'Reload File' button in the upper-right corner. PPP will open and process the file again, and this time it will do a 'Smart Search' of the Asset Descriptions as they are read in, trying to automatically assign the Asset Categories for you. You should only have to reload a file just this one time after you have initially set your Description, Date and Cost columns correctly. Reloading the file will override and reset any Asset Category changes you might have made.
How Smart Search Works - If for example, your county has a category such as 'Furniture and Fixtures', as PPP is reading in an asset record, it will search the Asset Description column value for keywords such as 'Furniture', "Fixture", "Chair", "Furnish", "Cabinet", "Folder" etc (not case sensitive). If PPP finds ANY of the keywords for 'Furniture and Fixtures', it will:
If Smart Search does not find any matching keywords for 'Furniture and Fixtures' in the Asset Description, it will then search the same Asset Description for the NEXT Asset Category's keywords, and so on, until it either finds a match, or finishes looking through your county's Asset Category keywords. Then PPP gets the next record etc. In a test of 2,000 assets with about 40% of the assets having a match, it took only about 5 seconds to open and process the entire file.
If Smart Search finds a match for an asset and flags its category properly, the asset is ready to be imported. We have attempted to build a reasonable database of 'keywords' that Smart Search uses, but there will be instances when assets are incorrectly auto-assigned. There will also most likely be several assets that don't get auto-assigned. In either instance you will need to assign these asset categories manually...
Assigning Asset Categories Manually - If 'Smart Search' doesn't auto-assign some assets (or some are incorrectly auto-assigned), you can assign them manually by any of the following methods:
Once you have done any of the above selection methods, a small Asset Category Picker window will pop up just beneath the lowest selected asset. This floating window contains a combo box that contains all of the asset categories that PPP uses for the county where this property is located. As you change the asset category (using either the up/down arrow keys OR by typing the first letter of an asset category), the selected asset(s) will change to the new asset category, their 'Import?' checkbox will be checked and 'YES' will be printed next to the checkbox. If you select the FIRST item in the combo box (Unassigned), all of the selected assets' Asset Category will change back to 'Unassigned', and the Checkbox will be unchecked.
If you type Alt-N (or press the 'Next' button) while in the Asset Category Picker window, the focus will move to the NEXT asset in the grid while keeping the Asset Category Picker open. Typing Alt-P ('Prev' button) will move to a PREVIOUS asset. Alt-N and Alt-P work well when assigning one asset category at a time since you don't need to Close the Asset Category Picker window when going from one asset to the next.
Once you get the hang of it, you will find it takes just a few seconds to change the category for each asset, and even less time if you select MULTIPLE assets at a time, and then press Alt-A to change all of the selected assets at once.
When the Asset Category Picker window is shown, several buttons on the Asset Import form are disabled. Pressing the ESC key or the 'Close' button will close the Asset Category Picker window, and the disabled buttons will be enabled again. Pressing ESC from the Asset Import window will close the Asset Import window itself.
TIP: If you sort the entire grid by Asset Description you might be able to group several asset types together making it easier to select them. For example, if you want to sort by Asset Description, click on the grid column heading of the Asset Description (it will read ## - Desc? depending on which column it is). You won't be allowed to sort if you have one or more 'Column Heading' rows in the export file. You can delete your Column Heading rows by highlighting the rows and then clicking the 'Delete Selected Rows' button, or PPP will do it for you by asking you if you want to delete them after you have tried to sort on any column of the grid when you have designated one or more Column Heading rows. PPP does not actually delete rows in your Export file, but only removes them from the grid. When in doubt, Reload the file again.
Now We're Ready - Once you have all of the assets you want to import flagged (Checked with 'YES' next to the checkmark), click on the 'Next Step' button near the top of the asset import form. PPP will load a new grid with ONLY the assets you have selected for import, showing just the Asset Category, Asset Description, Year Acquired, Cost, and a note if any (Date fields that are erroneous or blank will be converted to TaxYear-1 and so noted. An asset with a zero cost will be noted). Initially the new grid will be sorted first on the Asset Category column ascending, then sorted within each category by Year Acquired descending. You can sort on any column by clicking on the grid column heading (sorting is always in Ascending order when you click on a column). You can print a report of this grid of information by clicking on the 'Print Report' button. You also need to decide whether to APPEND or OVERWRITE the assets for this client/property. If you APPEND, PPP will simply add the current list of assets to this client/property's assets. If you choose to OVERWRITE, PPP will DELETE any existing assets for this client/property and then add these assets. PPP will remember the Append/Overwrite setting you choose for the future when you import assets, but not specifically for each client/property.
Importing ONLY Assets within a range of years - When you first setup your clients you will most likely want to import ALL assets (but skipping assets that are NOT reported on your County Rendition form, such as Vehicles in Oklahoma, or real property, etc). In subsequent years, if you decide to import new assets for clients rather than key them in manually (this is usually not the case but it can be done), you can might want to check the 'Flag all assets acquired from YYYY to YYYY checkbox in the bottom-left corner of the window. If this is checked, PPP will scan the Date Acquired column when reading in assets, and ONLY flag (check the checkbox) the assets whose Date Acquired column value is within that range of years. It will flag these assets regardless of whether or not 'Smart Search' can auto-assign an asset category. With 'Auto-Flag' turned on, if you are in the Asset Category Picker, pressing Alt-N or Alt-P will move not just to the next or previous asset, but the next/previous asset that is flagged to import, skipping the unchecked assets. If you do not have any 'Column Heading' rows, PPP will automatically sort by the 'Import?' status, moving all of the Flagged (checked) assets to the top, making it even easier to assign categories that were not auto-assigned or need to be changed.
Deleted (sold/removed) Assets - If you have prior assets within PPP for a client/property and the asset has been removed, the Asset Import routine will not automatically mark that asset as deleted, since we don't have a direct link to your software. You will need to open each client/property, click on the 'Assets' tab, click on the 'View All Assets' button, and 'Mark as Deleted' any assets that were in the system in previous years but that have been removed this year. However, if you decide to import all assets each year (this is usually not done), you can overwrite all of the assets in the final process of importing assets. This will remove all of the assets that are in the system for this client, and replace them with the assets that are being imported.
Special Note to Oklahoma - If a property is in Oklahoma (but not Oklahoma County) and you are using 'Beginning Balance Manual Entries', you should not import all of your client/property assets since you will be duplicating the asset costs. You can however clear out the 'Beginning Balance Manual Entries' if you have been using them, import all of your clients assets, and make sure you end up with the same 'Beginning Balances' for the next year.
Other:
Sorting - We can't accurately sort on the DATE or the COST
columns with this grid. Trying to do so will give you a message that it's not possible.
Multiple Sets of Records - Some
software might write out all of the assets as 'Current Year' and then duplicate
all of the records beneath these rows, but showing 'Next Year' data etc.
If you get more than one set of data you will need to highlight all of the rows
below the initial set and delete them. If this is the case, try and limit
the amount of information that is exported from your tax/asset software to just
one set of asset information.
Issue: On many “Signature” forms, the
account number is printed as a barcode to expedite processing by the county. If
instead of a barcode you see the account number in a large font (sometimes
surrounded with asterisks "*") and the bottom gets chopped off, or you don’t see
a barcode at all, then the barcode font FREE3OF9.TTF is not
installed (or not being recognized) on the computer that is previewing/printing
the return.
This can occasionally happen during installation if Windows
permissions or security settings prevent the font from being installed for all
users.
Resolution: Close Personal Property Pro if it is running. Click Here and SAVE
the font file FREE3OF9.TTF to your Downloads folder or
to your Desktop.
Unblock (if present) the file:
Right-click FREE3OF9.TTF → Properties →
if you see an Unblock
button/checkbox, click Unblock → Apply → OK.
Install the font:
Right-click FREE3OF9.TTF and choose Install for all users.
(If you don’t see that option, click Install, or ask your
IT/admin to install it.)
Alternate method: Open
C:\Windows\Fonts\ and drag/drop the font file from Downloads/Desktop into that
folder (Windows will register the font automatically).
Start Personal
Property Pro, select a client and preview the return; you should see the
barcode.
If it still doesn’t work: Reboot and try again.
If needed, go to Control Panel → Fonts →
File → Install New Font… and browse to the
folder where you saved the font (Downloads or Desktop), select FREE3OF9.TTF, and
install it.
Multi-seat / server note: The barcode font
must be installed in Windows on the computer that is previewing/printing the
return. In most multi-seat setups, install it on each workstation.
If you preview/print from the server during server setup (or
run PPP via Remote Desktop/Terminal Server/Citrix), install it
on the server (for all users).
Top of Page
Personal Property Pro now calculates the Fair Market Value of assets for you. This is especially helpful in Texas and Florida, where the return itself can ask what a fair market value is for assets. To calculate this, the program uses the following items:\
Note: In 2024 Oklahoma added a new field regarding Fair Market Value. Be sure to click here for more information.
1. The Cost of the asset.
2. The Year Acquired (from which the Age of the asset is
calculated).
3. The Economic Life of the asset (based on the asset
category the asset is assigned to).
4. The 'Present Value' table (sometimes called 'Percent Good')
for Economic Lives of 2, 3, 4, 5, 6,
7, 8,10, 12, 15, 18 & 20 years.
You can choose instead to use 'Straight Line' calculations along with a 'Salvage Value' percent.
|
Click on the thumb-nails to see screen shots of FMV Setup and Asset Entry screens |
||
|
Present Value table |
Economic Life |
Asset entry with FMV
calculations |
For the 20+ largest counties in Texas, 19 counties in Florida, as well as Tulsa and Oklahoma county in Oklahoma, we provide you with preset tables. In most cases we have acquired this data from county websites. If you find any discrepancy in any of our preset tables, please notify us by following the instructions in the program when you make any changes. You can make changes to these tables and use the changes immediately. For all other counties, we have preset 'State Default' tables that you can use. These 'State Default' tables are not necessarily provided by or approved by any state and/or county but are general values. We can add any other county's Present Value table to our program, so if you are doing a return in a county where we do not have a preset table and you choose not to use the 'State Default' table, and you know the Present Value table percentages are available from the county, please notify us so we can add this table for future releases! Some county's also have an 'Inflation Index' or 'Factor' that is used in calculating the 'Present Value' table. Where available, we have included this in the Present Value percentages. We encourage you to check the accuracy of the 'Present Value' table and Economic Life values for county's that you use.
Every time a client return is opened, previewed or printed, the program recalculates the FMV for all of the assets for that client. If you have opened a client return, you can access the assets of the client, and see the FMV calculations for each individual asset. You can override the default LIFE for any individual asset, rather than accepting the default Economic Life that the program uses. Several existing reports now include the FMV calculations, including the Cross-Tab Summary, Additions & Deletions (TX & FL), generic 'Asset List', and the new 'Asset List All Companies' reports.
Accessing the FMV setup window: Click on the menu item 'Setup' and then click 'FMV - Method, Present Value Table, Economic Life' menu item to access the FMV setup screen. On the left side, you can assign a system-wide default for all clients regarding FMV calculations (Use Manually Entered FMV Values, Use FMV Table Calculations, or use Straight Line Depreciated Values with a Salvage Value percentage). If you have selected a client from the Clients window (or actually opened the client) for Texas or Florida return and then opened the FMV setup screen, you will also see beneath this section, a section where you can specifically assign the settings for this individual client (choose to either use the system-wide default, use Manually Entered FMV Values, Use FMV Table Calculations or use Straight Line Depreciated Values with a Salvage Value percentage). On this FMV setup screen, you can select any State and County within that State. As you do, the program will show you the State Default table for that county as well as the Economic Life used for each asset category.. For any county, you can then 'Load' the preset Present Value table for any specific county that is in the list, although that is not necessary since the program uses the county specific data where available. Some counties use the same Present Value percentages as other larger counties. In that case, you can select any county in the list, and load it for use for returns in the county you have selected. By default, if the program contains a preset Present Value table for any county, it will use those values even if you have not 'loaded' it for that county. In this case, it will show 'State Default' numbers in the table while turning the 'Load Table' button and county drop-down GREEN, showing you that it has values for that county. You can then 'load' this specifically for the county so you can see and verify the Present Value percentages. If you change any values, it will use your changes. Also on this screen, you can see the 'Economic Life' that is assigned for any county in any state. Many counties are assigned the default Economic Life that ships with the program. You can change these defaults from this screen as well.
This has been tested with Vista Home Premium, Win7-8-10 Pro and Windows servers 2008, 2012, 2016, 2019
If you are installing PPP on a stand-alone computer (or server) that is running Win7, Win8, Win10, 2008, 2012, 2016 or 2019:
Allow users 'Full Control' (full rights) to the folder where PPP was installed by following steps 1-12.
NOTE: Version 7.0 installation and beyond now automatically does this! You need to do the steps below only if you have an error such as 'Path/File access' error.
Uninstall ANY PPP product using Control Panel/Programs and Features (formerly 'Add-Remove Programs')
Download and install the newest version of Personal Property Pro, noting where you install it to.
If you are installing PPP on a client (workstation) computer that is running Win7, Win8 or Win10:
OR check 'Advanced' and add the server where PPP is installed to the web zone:
Example: //HP-Server1 or //SomeServer/SomePathToPPP/
If you skip step 7 Win7-8-10 will ask if you want to run "MergePDF.bat' whenever you save returns are PDF files.
The following steps will help you in setting up your peer-to-peer network by utilizing a mapped drive. These steps apply specifically to Windows XP, and may vary slightly on different operating machines. Have your network administrator perform these steps.
Now all machines can simultaneously run the program without Personal Property Pro re-linking the database tables when each user starts the application.
Why would you ever change the tax year within Personal Property Pro? Generally speaking, you never should, but you might have situations where you would consider doing so. When you change the tax year to a previous year, Personal Property Pro will run as though the new tax year is the actual current tax year within the system. Adding assets will be limited to acquiring them in TaxYear-1, all forms will print with the new year, calculations and printed amounts will be based on the new year as well.
When you close and re-open Personal Property Pro it will always revert back to the current Tax Year set by your license.
NOTE: One reason to change the tax year would be to review or print prior year county rendition forms. The need for doing this has been made obsolete since we have added the ability to print returns as PDF files. That said, as long as your county form doesn't change and its asset categories haven't changed and the FMV values haven't changed, PPP should create an accurate return for prior years (the exception being inventory/raw materials/supplies/etc and any inventory-related Freeport Exemption form). We do not guarantee the accuracy of forms printed after changing the tax year to an earlier year, since county forms and/or asset categories and/or FMV values may have changed, or our database layout might have changed. We strongly recommend that you save your returns as PDF files in current years and print those PDF files if you need to print prior year returns later. To save a return as a PDF file, select the client, click the 'Print Return' button, select the forms you want to save as PDF files, and click the 'Save as PDF' button. Personal Property Pro will tell you where the files will be saved (as well as how to change this location), and then create each page of each return, and save them as PDF files for you.
Another reason to change the tax year might be if you are were manually adding assets acquired in prior years. Originally, PPP didn't let you determine the 'Year Reported' when adding or editing assets. It only let you set the 'Year Acquired', and by default it always set the Year Reported to the same year as the Year Acquired. Since it is possible to acquire an asset in one year and forget to report it until years later, we added the ability to set both years when adding or editing an asset, thus making this reason to change the tax year for this purpose somewhat obsolete. We have also added robust Asset Import functionality to the program, which again makes adding your prior year assets by hand obsolete (if your current tax or asset software can export assets).
Lastly, you might want to change the tax year to test the program's ability to calculate and print assets either as prior year or current year (as we do). Let's say you are trying out the DEMO program and have setup a few customers with their real asset data. You fall in love with the software (how can you not) and buy the program. When you register your software, our website sets your tax year to the new tax year (after the January release or earlier if you request it). You can roll the tax year back and see how the system correctly handles your assets (prior year versus current year etc).
Special Notes:
1) If you don't use PPP's cover
or transmittal letters, you don't need to
copy over the .rtf files
2) *.rpt files
(ending in a
t) are
NOT to be copied to the new
computer.
NOTE: Version
7.0 and beyond now has the ability to find and restore a database for you:
1)
Click on menu item 'File'
2) Then click submenu item 'Database Functions'
3) Click on the 'Restore Database' tab, and locate the database
to restore.
If you had already
registered the CURRENT year's software on that computer, you
will still have to first unregister the program on the old
computer.
If you don't use
the program's 'Restore' function, follow the steps below.
Personal Property Pro uses a product called Crystal Reports to print its forms. Brother has an update that resolves a problem where the form prints the lines, but there isn't any data or text on the form. We found an update you can get by reading this article: http://tinyurl.com/7pnx2 As always, it is best to contact your support personnel before installing any update.
We provide this service for a fee of $750 to merge two company database files.
If you need this service, please
perform the following steps:
1) At each location, make a manual backup of all of the data files
if you do not already have a backup on your server etc.:
Start PPP
Click menu
item 'File', then click 'Database Functions'
Click on the
'Manual Backup' tab (it is the first tab where you should be).
Click the 'Backup Database Files Now'
button.
2) At each location, Compact the database:
Make sure
nobody else in in PPP
Start PPP
Click menu
item 'File', the click 'Database Functions'
Click on the 'Compact Database'
tab
Click the
green
'Compact Database Now' button.
Exit PPP
Start PPP and make sure you see your clients, then exit PPP.
You may also want to make another backup to a different location (see step 1
again)
While on the
'Manual Backup' tab, make a note of the GREEN
box. This is the location where your data files are located.
If you double-click the green box, it
will open that folder so you can easily find the database file mentioned in the
next step.
3) At each location, find the file called dbData.mdb. It is
located in the \_~private\ folder beneath the folder where PPP is installed.
Example:
C:\Program Files (x86)\Personal Property Pro\_~private\dbData.mdb
or
D:\SomePath\Personal Property Pro\_~private\dbData.mdb
4) Copy each dbData.mdb file and save them all into one new
folder. Rename the copy based on the company name:
Example:
JonesAndCompanydbData.mdb
SmithCPASdbData.mdb
EdwardsdbData.mdb (if there was a 3rd database to merge)
5) Zip these files into one zip file (SomeName.zip) and email it to
sales@personalpropertypro.com
In the email, tell us:
A) Which company file is considered the 'master' file (Ex: SmithCPASdbData.mdb).
The other file(s) will be merged into this file.
B) How many returns are in each file (we will verify this).
6) Make a payment for the service ($750 if merging two
database files, $1,500 if merging three etc). In the payment process
please make a note
detailing what the payment is for, such as 'Merging Databases'.
After we get the files and payment for the service, we will:
A) Count the total Clients, Properties and Assets in each original file.
B) Print out the first 3-5 returns from each original file (alphabetically).
C) Merge the data from the files into one file (the 'master' file).
D) Verify that the total number of Clients, Properties, and Assets in the merged file matches the sum of the original files.
E) From the merged file, print the same 3-5 returns from each original file and compare the returns, asset totals etc.
F) Zip and email a file to you that contains 'MERGEDdbData.mdb' that will have all of the data merged into this one file.
... your steps continued ...
7) Extract and rename MERGEDdbData.mdb (the file we zipped and emailed
back to you) to dbData.mdb.
8) Copy dbData.mdb over the top of your existing
\Personal
Property Pro\_~private\dbData.mdb file at your master location.
9) Right-Click dbData.mdb, click on Properties, and make sure
the 'Read-Only' attribute is NOT checked.
10) Run the program and verify that your returns are there, the
total clients is accurate,
and check two or more returns for accuracy.
11) Reregister your software (click menu item 'File' then
'Register', make sure your email address is entered and click the Register
button.
12) If the combined databases exceeds 200 clients/returns, you may need
to upgrade your plan at
http://www.personalpropertypro.com/upgrade.htm
You may get a message 'The Publisher Could Not Be Verified' when starting the program every time. This has to do with security procedures for Internet Explorer Click Here for an example from another company on what this is, and how to stop it from happening.